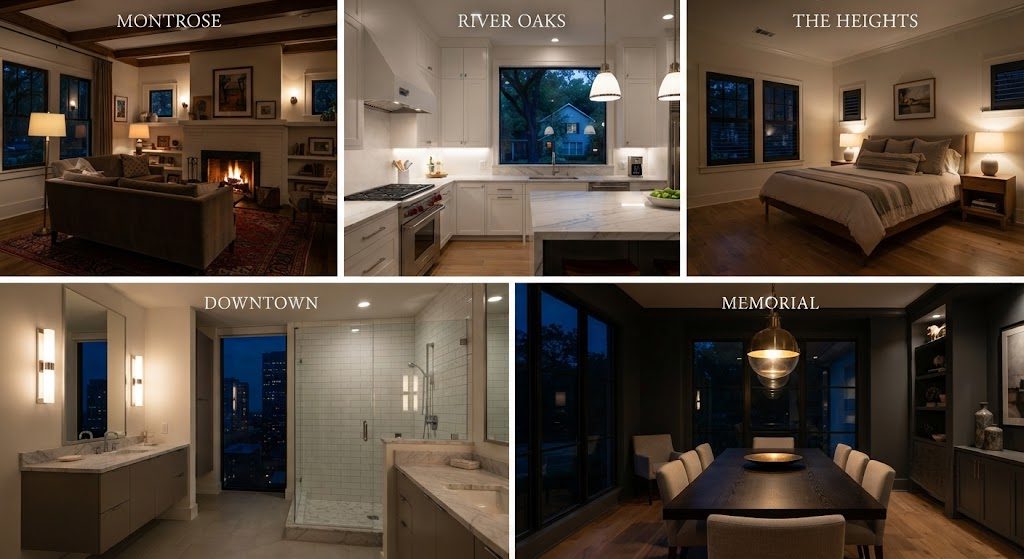
I live in Houston, and I photograph this city at night the way some people photograph national parks. The neighborhoods change — Montrose bungalows to River Oaks estates, Heights cottages to downtown high-rises — but the question is always the same: does this room feel good after dark?
This photo essay collects five rooms in five neighborhoods that answered yes. I've changed the homeowners' names at their request, but the rooms are real, the fixtures are off-the-shelf, and every lesson is transferable.
Montrose Bungalow: The Layered Living Room
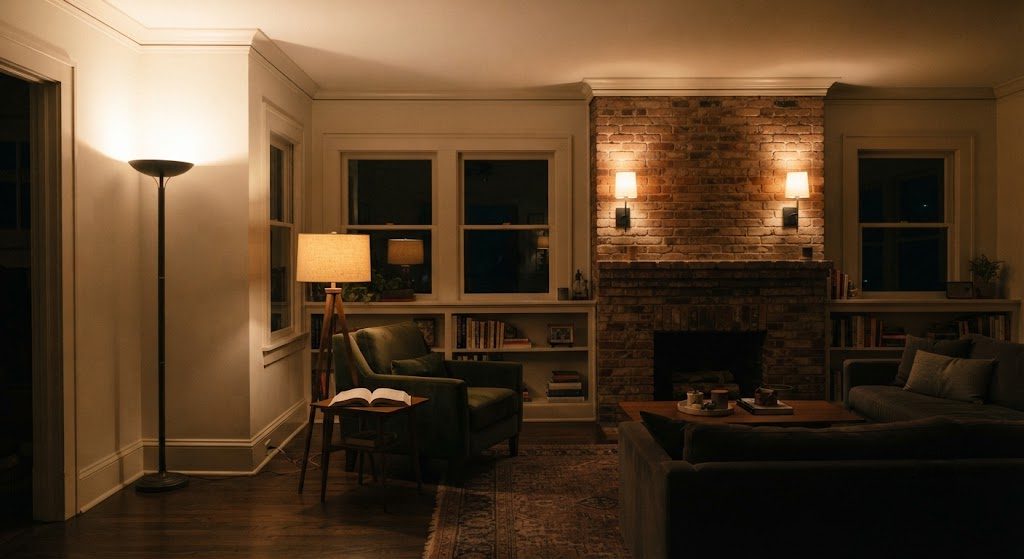
This 1920s bungalow on a tree-lined street in Montrose has 8-foot ceilings and a long, narrow living room that could have felt like a bowling alley after dark. Instead, it feels like a warm study. The homeowner — a photographer who understood light intuitively — did three things right.
First, she refused recessed lights. The ceiling is original plaster, and she wasn't going to cut eight holes in it. Instead, two plug-in torchiere lamps in opposite corners wash the ceiling with 2700K light that bounces back down as soft ambient fill. Second, a floor lamp with an opaque linen shade sits next to the reading chair, providing task light that doesn't spill into the rest of the room. Third, a pair of plug-in wall sconces flank the fireplace, casting vertical light across the brick and making the fireplace feel like the room's anchor instead of its afterthought.
The lesson: you don't need a recessed grid to layer light. This room has three distinct layers — ambient from the torchieres, task from the floor lamp, accent from the sconces — and not a single hole was cut in the ceiling.
River Oaks New Build: The Kitchen That Works
River Oaks kitchens tend to be large, open, and loaded with recessed lights in a rigid grid. This one is different. The homeowner worked with a lighting designer during rough-in (I wish I could say it was me, but it wasn't), and the result is a kitchen where you can actually see what you're chopping.
The critical move was simple: under-cabinet LED strips mounted at the front edge of every upper cabinet, hardwired during rough-in and switched separately from the ceiling lights. The ceiling grid provides ambient fill, but the task layer comes from the under-cabinet lights, and they're on a dedicated dimmer. When the cooking is done and the dinner party moves to the living room, the under-cabinet lights drop to 20 percent and the ceiling grid dims to a warm glow. The kitchen doesn't scream "kitchen" anymore — it becomes part of the entertaining space.
The lesson: task light on its own circuit changes a kitchen from a workspace into a room that can shift mood. I covered this principle in the kitchen lighting plan earlier in this series, and this River Oaks kitchen is proof it works.
Heights Cottage: The Bedroom That Dimmers
This 1930s Heights bedroom gets one thing exactly right: every light source is on a dimmer, and the homeowner uses them. Table lamps on both nightstands dim to a candle-like glow. A single semi-flush ceiling fixture provides ambient fill when needed, but it's rarely above 30 percent. A small picture light over a dresser highlights a collection of pottery.
The magic isn't in the fixtures — they're modest, mostly from a national retailer. The magic is in the control. This bedroom has at least four distinct moods depending on the dimmer settings: bright for getting dressed, medium for reading, low for winding down, and off except for the nightstand lamps for the last hour before sleep. The homeowner told me she didn't realize how much the bedroom's lighting affected her sleep until she got the dimmers.
The lesson: the dimmer is the most undervalued lighting tool in a home. I wrote about dimmer compatibility and the difference between TRIAC and ELV earlier in this series. This bedroom uses ELV dimmers throughout, and the smooth dimming curve down to zero makes the room feel custom.
Downtown Condo: The Bathroom with No Overhead Light
The bathroom lighting mistake I see in 90 percent of renovations — a single overhead fixture above the vanity — is absent here. This downtown condo bathroom has zero ceiling lights over the mirror. Instead, two vertical sconces flank the mirror at 64 inches from the floor, and a small recessed light over the shower provides wet-area illumination on a separate switch.
The result is a bathroom where you see your face clearly, without shadows, every morning. The homeowner told me guests regularly comment on how good the light is in that bathroom, which is not a thing guests normally notice. They notice it here because the light is flattering, and flattering bathroom light is so rare that people register it as unusual.
The lesson: eliminate the overhead vanity light. Put sconces at face height, and your bathroom will make you look the way you actually look.
Memorial Estate: The Dining Room That Puts All Its Eggs in One Pendant
I include this room because it breaks my usual rule. I preach layering, and this dining room has essentially one light source: a large, sculptural pendant centered over the dining table, on a dimmer. No sconces. No recessed ambient. No accent.
It works because the pendant is chosen for the table, not the room. The shade is wide and opaque, directing all light down onto the table surface. At full brightness, the table glows and the rest of the room fades into warm shadow — which is exactly the right mood for a dinner party. At 20 percent, it becomes a candlelit anchor that makes the room feel intimate without feeling dark.
The lesson: a single fixture can work if it's the right fixture, chosen for the right surface, on a dimmer. The pendant height formula I covered in an earlier post was followed precisely here — the bottom of the shade sits at 34 inches above the table, low enough to feel connected to the dining surface, high enough to see across.