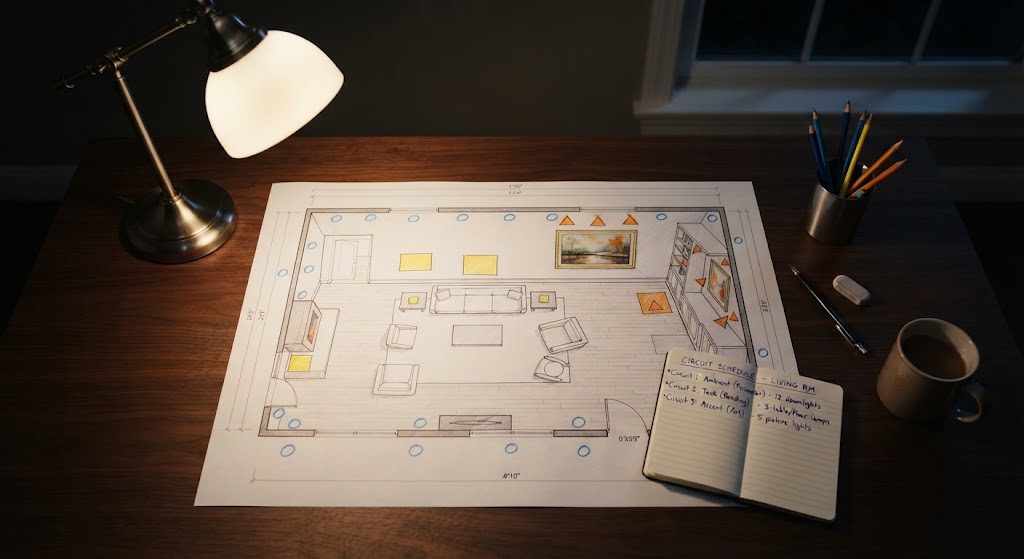
Every lighting plan I've ever drawn — from Montrose bungalows to River Oaks estates — follows the same six-step process. It doesn't require design software, a lighting degree, or an aesthetic instinct. It requires a floor plan, a pencil, and the discipline to think in layers instead of fixtures.
This is the method. It's the synthesis of everything covered in the previous nineteen posts, and it works for any room in any home. I've used it for living rooms, kitchens, bedrooms, bathrooms, offices, and dining rooms. If you're renovating or building, do this before the electrician shows up for rough-in. If you're working with an existing room, do this before you buy a single fixture. Print a floor plan of the room — even a rough sketch with dimensions — and follow along.
Step 1: Measure and Map the Room
You can't light a room you haven't measured. I start every project with dimensions: length, width, and ceiling height at minimum. If the room has a sloped ceiling, a soffit, or a beam running through it, note those too — they affect where light can go and where it will be blocked.
Draw the Fixed Elements First
On your floor plan, mark everything that won't move: windows, doors, fireplace, built-in bookshelves, countertops, the vanity, the bathtub. These are your constraints. Light placement works around them. A recessed light too close to a window creates a reflection at night. A sconce mounted on a wall with a door swing is a broken fixture waiting to happen. Mark the obstacles first, and your placement decisions will avoid them automatically.
Mark the direction each door swings. Mark the window heights, not just their locations — a window that goes to the floor blocks a different light placement than one that starts at counter height.
Step 2: Map the Activities
Light serves what happens in the room. Before you place a single fixture, list every activity that will occur in the space. Be specific. "Living room" isn't an activity. Reading in the armchair is. Watching movies on the sofa is. Having conversations over drinks is. Playing board games at the coffee table is.
One Activity, One Task Zone
Every activity that requires hands and eyes to work together gets a task zone. The reading chair gets one. The kitchen island where you chop vegetables gets one. The bathroom vanity where you shave or apply makeup gets one. The desk where you type gets one. Circle each task zone on your plan and label it. These circles become the locations for your task layer.
The activities also tell you how the room will be oriented. If the sofa faces the TV, the lighting around the TV needs to avoid glare on the screen. If the seating faces inward for conversation, the light should wrap the perimeter and let the center stay softer. The activity map drives every placement decision that follows.
Step 3: Place the Ambient Layer
Ambient light is the room's foundation. Its job is to fill the space with even, shadowless illumination — not to spotlight anything, not to create drama, just to make the room feel open and welcoming before you add anything else.
Start at the Perimeter, Not the Center

For recessed ambient lights, place them around the perimeter of the room, roughly 24 to 30 inches from the walls, and aim them at the wall surfaces. The light bounces off the walls and fills the room indirectly. This is the opposite of a builder grid, which puts lights in the center and blasts the floor. Perimeter placement creates reflected ambient light — softer, more even, and far more flattering. Use wide-flood trims with at least a 40-degree beam angle for this layer.
If recessed lights aren't an option, use plug-in torchiere lamps in corners to wash the ceiling, or a central semi-flush fixture with a diffuser that throws light sideways. The principle is the same: ambient light should feel like it's coming from everywhere, not from a single obvious source.
Count the number of ambient fixtures and check the spacing. For a room with 9-foot ceilings, ambient recessed lights should be roughly 5 to 6 feet apart. Closer spacing creates more even illumination but requires more fixtures. Tighter budgets can stretch to 7 feet without noticeable drop-off.
Step 4: Add the Task Layer
Task light goes exactly where the activity zones are — no closer, no farther. Each task zone you circled in Step 2 gets a dedicated light source.
One Fixture Per Zone
The reading chair gets a floor lamp with an opaque shade, positioned to the side of the dominant hand, with the bottom of the shade at roughly 48 inches from the floor. The kitchen island gets pendants spaced 24 to 30 inches apart, with the bottom at the height determined by the formula from the pendant height guide — start at 36 inches above the counter and adjust for ceiling height and sightlines. The bathroom vanity gets vertical sconces at 60 to 66 inches from the floor, flanking the mirror. The desk gets an adjustable arm task lamp positioned to avoid screen glare.
Mark each task fixture on the plan. Write its type — floor lamp, pendant, sconce, under-cabinet strip — and its mounting height if it's hardwired. This is what the electrician needs to know during rough-in.
Step 5: Layer in the Accent
Accent light is the sculptor. It highlights the things you want people to notice: art, textured walls, bookshelves, architectural details. It creates the third dimension that separates a composed room from a merely bright one.
Choose Three Features, Maximum
Walk the room and pick up to three features worth highlighting. The large painting above the sofa. The textured stone fireplace surround. The bookshelf with your collection. For each, choose a fixture type: an adjustable recessed spot with a narrow 15-to-25-degree beam for art and bookshelves, a floor grazer for textured walls, a picture light mounted directly on the frame for paintings.
Add these to the plan in a different color. Mark the beam direction with an arrow. Accent fixtures need to be roughly three times brighter on the illuminated surface than the ambient light on the surrounding wall to create visible contrast. That ratio is achieved through beam angle and distance, not wattage — a narrow beam placed closer to the target creates higher contrast.
Step 6: Assign Circuits and Switches
This is the step that separates a room that works from a room that's stuck at one brightness forever. Each layer gets its own circuit. Each circuit gets its own dimmer.
Write the Circuit Schedule
On your plan, label each fixture with a circuit letter. Circuit A: all ambient fixtures. Circuit B: all task fixtures. Circuit C: all accent fixtures. If you have multiple task zones that need independent control — say, under-cabinet kitchen lights and island pendants — split them into Circuit B1 and B2.
A room with three circuits on three dimmers can be tuned to any activity and any time of day. A room with everything on one switch is either all-on or all-off. The wire for separate circuits costs almost nothing during rough-in. The dimmers cost thirty to fifty dollars each for good ELV units. The difference is a room that feels custom versus a room that feels like it came with the house.
Hand the circuit schedule to your electrician. It tells them exactly which fixtures go to which switch, and which switches need a neutral wire for ELV dimmers. This is the document that locks in your lighting plan.
The Template
This method — measure, map activities, place ambient, add task, layer accent, assign circuits — is the framework behind every project I've ever done. It works for a 100-square-foot bathroom and a 1,000-square-foot open-plan living space. It works whether your budget is three hundred dollars or thirty thousand. The variables change. The process doesn't.
In the coming weeks, I'll publish a downloadable lighting plan template that walks you through all six steps with a blank floor plan grid, a circuit schedule table, and a fixture placement checklist. Subscribe to the newsletter to get it when it's ready. But you don't need the template to start. You need a floor plan, a pencil, and the willingness to think about your room in layers instead of light bulbs.
That's The Fixture Guide. Twenty posts. One framework. Go light your home like an engineer.